Showing posts with label Home Altars. Show all posts

Thursday, April 2, 2020

Making a Paschal Candle

Go here or here to see how your parish version is made.

Or make your own for your family's prayer center using these simple directions:


  1. Cut a piece of white tissue paper, approximately 8 x 10.5 and carefully tape it onto a piece of copier paper.  It will work best if it is all very flat.
  2. Copy this image onto the tissue side (NB - there are enough images on this page for 3 candles (or one if you happen to make a mistake or two)
  3. Cut the page in thirds along the width and, centering the image on your candle, hold the blank ends behind the candle, shielding your fingers from the heat during the next step.
  4. Using a hair dryer on high heat simply melt the cross image onto the front of the candle.  Once it's tacked in place by the heat you can trim the tissue paper ends and continue to melt down the paper edges.
  5. I use gold map pins for my "grains of incense."

Wednesday, September 23, 2015

Make it: Mini Saint-of-the-Day Shrine


I'm slowly becoming resigned to the fact that I'm probably never going to be the mom who has the perfect dessert for every big feast day. (Plenty of people are, including some of my co-bloggers, and more power to them.) I still wanted this to be the year that I upped my liturgical game, though. So, having been inspired by this Facebook photo of unknown origin, I set out to create a shrine for our home altar that could be a home for our saint of the day.

Materials:
  • dollhouse room box (I'm having trouble finding anything similar online, but these are from the dollhouse furniture section at Michael's)
  • gold acrylic paint
  • fancy scrapbook paper
  • miniature egg-and-dart trim (found in the craft wood section of Michael's)
  • small crucifix, about 1½" or less (ours are from broken rosaries)
  • medium-sized wooden bead, or gold polymer clay (to hold the crucifix)
Tools:
  • paintbrush
  • small hand saw, sandpaper, and wood glue (for trim. The wood is soft, so I imagine a utility or craft knife could be made to work in a pinch)
  • spray glue or rubber cement
Michael's sells the dollhouse boxes in two sizes. On the left is the small size with, from left-to-right, a saint block from AlmondRod Toys, a standard craft store peg doll*, and a larger peg doll (3 5/8"). The same dolls are shown in the larger-sized box on the right.

Cut the trim to just a hair longer than the width of the box (to allow for sanding), and sand the ends smooth. Attach with wood glue so that the top of the trim is even with the top of the shelf, and let dry.

Paint the box and trim with the gold paint, leaving the back surface white. This took more coats than I'd expected (5-6), but the paint dries quickly, so you really only need to give it five minutes or so between coats.

Cut the scrapbooking paper to fit (centering the motif, if necessary). The boxes weren't quite square, so we cut them just a tad big, and shaved off little bits until they fit. Glue to the back with rubber cement or spray glue.
We used wooden beads with holes large enough to accommodate the crucifix, painting them gold to match the shrine. (Something like this might also work, but I haven't tried it myself.) If you can't find something similar, you can mold a base out of polymer clay, using the crucifix to make the hole in it before baking.** Whichever you use, use a tiny bit of hot glue to secure the crucifix if necessary, then use hot glue or wood glue to place it on the top shelf of the shrine.

The glue is dry, you are ready to display your saint of the day! If you don't have figurines, I've found that the larger-size box is just right for propping up a standard holy card.

Other ideas:
  • A paper banner, reading "Saint of the Day," or "Ora pro nobis," instead of the trim.
  • Tiny silk flowers in a vase made from a large fancy bead or a wooden candle cup.
  • Tiny votive candles (just for decoration, of course!)

*Sorry, I don't have the dimensions. Maybe when Margaret Mary is back from Philly, she can help me out.
**I was really hoping these would work, but sadly, they're just a tiny bit too big!)

Wednesday, November 27, 2013

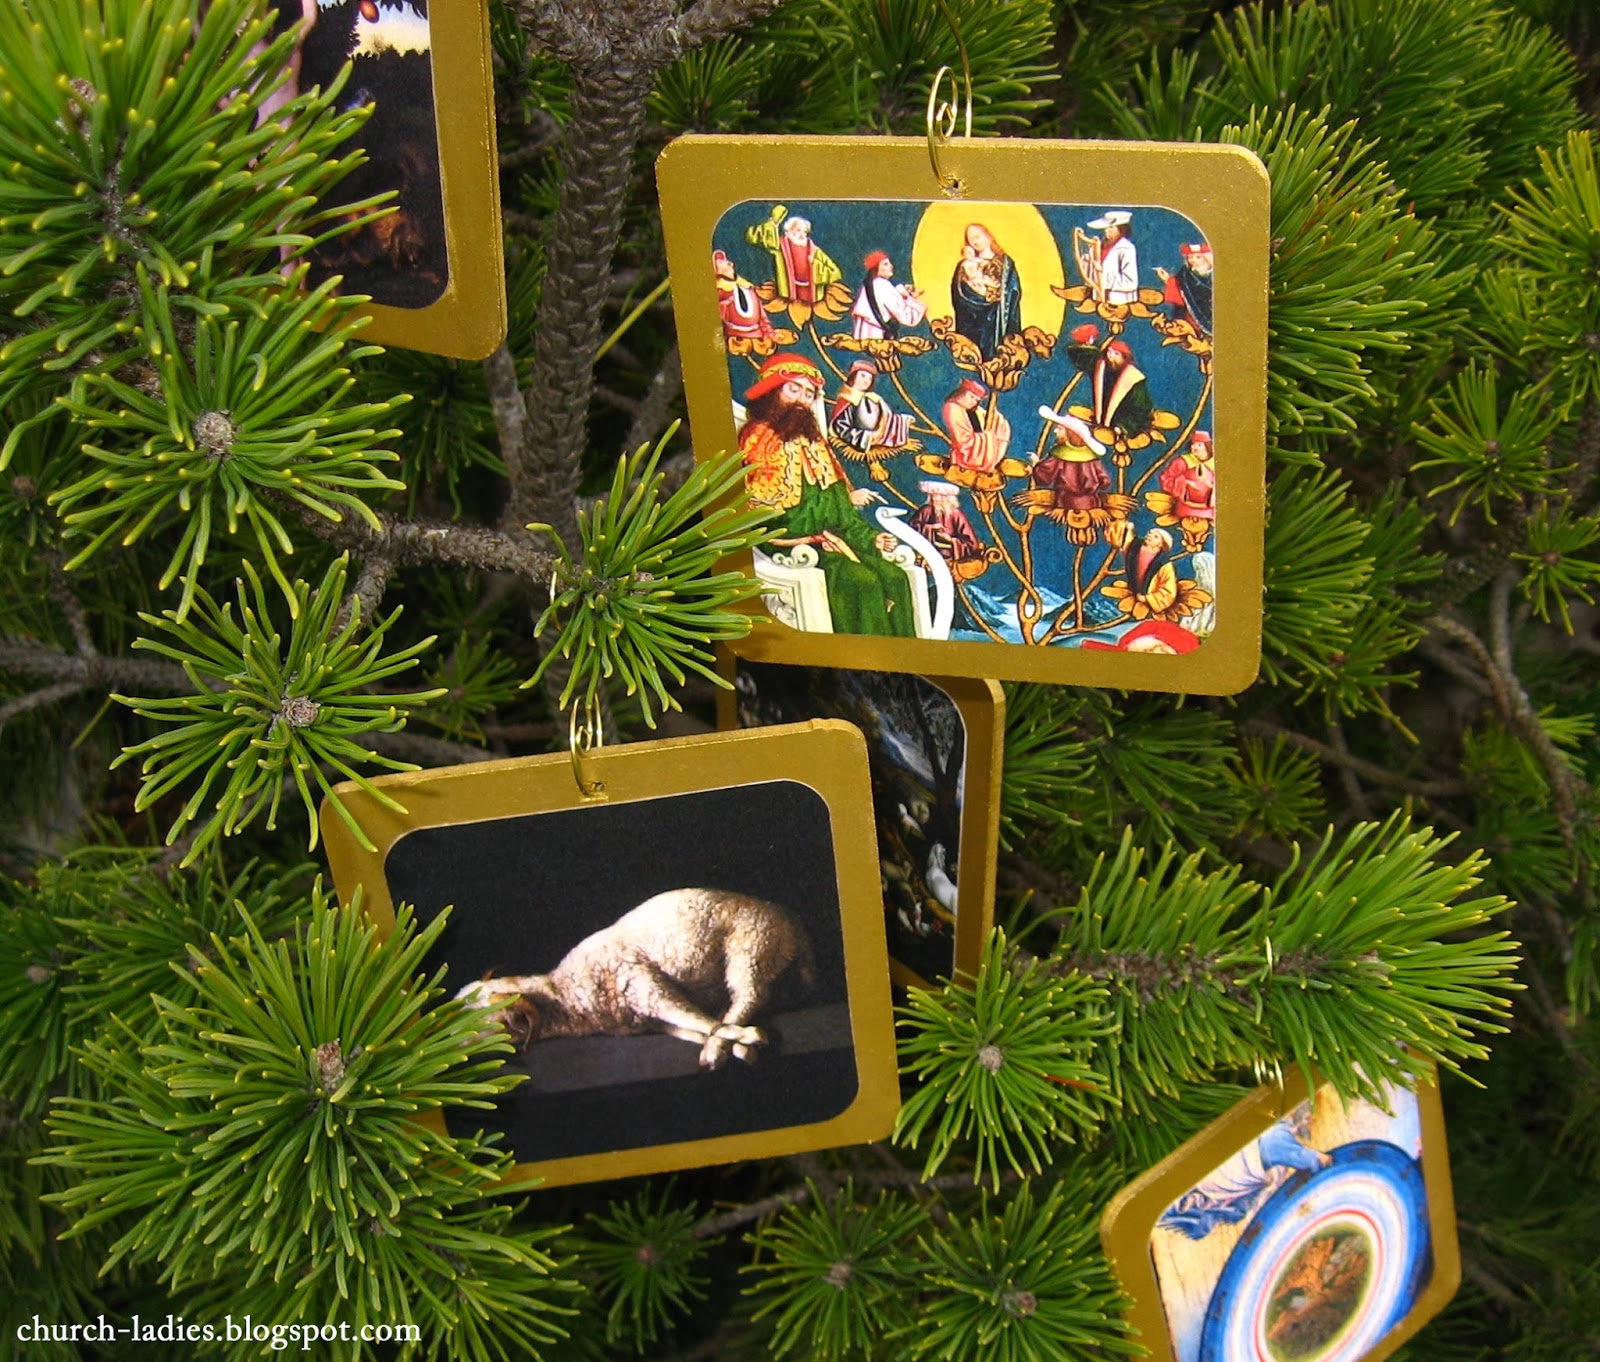
Printable: Fine Art Jesse Tree

I am always looking for ways to incorporate more beautiful art into our devotional life at home. So, as we approached Advent, a time that speaks to the domestic church in a particularly profound way, it seemed to me a natural time to bring some of this art into our home. Filling our Advents with beauty can also help sustain us through the season, when all around us is screaming to celebrate Christmas before its time (mostly by buying things, of course).

For those of you who are unfamiliar, the Jesse Tree consists of a daily reading from scripture, along with an ornament containing a symbol for each reading. The readings trace salvation history (the tree represents Jesus' family tree), beginning with creation and ending with the coming of the Messiah. For our version, Margaret Mary and I went hunting to find a piece of art for each day. We tried to represent a variety of styles and periods of art, so hopefully there is something here to inspire everyone. (If you ever need good sources of art for your own projects, I highly recommend starting with Wikipedia and the Web Gallery of Art. The wreaths on the back of the ornaments are courtesy the wonderful Graphics Fairy.)

These ornaments can be used in a variety of ways. At their simplest, they can be printed out and hung in a row on a garland or along your mantel. Hang a new one each day, or hang them all at once with the backs showing, then flip one so that a new piece of art shows every day.  If you are short on space, get a 3" display easel, such as this one or this one, and display just that day's picture on it. If you are willing and able to set up your tree this weekend, they can be the ornaments for this season, and then the tree can be decorated in all its festive Christmas glory after the last of them has been read, with the Christmas ornaments either replacing or adding to the Advent ones.

Prayer

Each day, gather as a family to read the reading printed on the back. NRSV and New Jerusalem translations tend to be nice for reading aloud. Use a children's translation if that's better for your crowd, or even find a storybook version where you can. This is a good time to light your Advent wreath each night. You may wish to close with your family's usual nightly prayers, or some special prayers for Advent (a few ideas are here). If you own a copy of the Liturgy of the Hours (or Christian Prayer), pray the closing prayer for each day (or some or all of Vespers, if your children have the attention span).

The ornaments are matched to days of Advent, rather than dates in December, so most years you will have some extra. You can choose whether to double up readings on some of the shorter days, or just skip some at the end. For example, this year, you could go straight from the Annunciation to the Nativity.

Using the PDFs

The ornaments are formatted to be 3.25" square. We've done our best to pick uncrowded, high-contrast pieces of art that shrink down to this size well, but I still recommend using the highest quality printing available to you. Our prints are made on a color laser printer. If your home printer isn't up to the job, a Kinkos-type place should be able to do it fairly cheaply.

There are four files linked below: one designed for printing double-sided, two containing fronts and backs separately (in case you want to avoid paying the color rates for the black-and-white backs, or if you'd like to print the backs on off-white or colored paper), and a sheet containing just the readings and information, in case you want to make the ornaments single-sided.

The color pages have registration marks to help you cut them out neatly. The file with the ornament backs only has registration marks that should be useful whether you want to cut them into squares or circles (I used a Fiskars circle cutter for the job). Cutting the circles can be a bit tricky to get used to, so I left a blank one at the bottom of the ornament backs file to practice on.

If you want to pass them along to a friend (and please do!), we'd ask that you send them a link to this post, rather than copying the PDF file itself. If you would like to use them in a group setting or redistribute print/PDF versions, please email us to ask first.  Thanks!

For laminated ornaments:

Print out the back-to-back PDF, double-sided, on cardstock (you may wish to test-print the first two-sided to make sure everything lines up correctly on your printer). Laminate the pages, cut out the ornaments and punch a hole for hanging near the top.

For wooden ornaments:


Any craft wood about 4" square should work. We used Darice MDF coaster blanks (found at JoAnn) for the base of the ornaments.

After drilling a hole near the top (you should have just shy of 3/8" margin at the top), we painted the borders and edges with two coats of gold acrylic paint. If you are cutting the backs in a circle, make sure to paint well into each corner on one side to cover everything that will show (cut a scrap piece to the same size and use it to check)


Print the art and label files separately on cardstock and cut them out. We used a round corner punch on the art pieces to better match the wood, and cut the backs out as circles. After the paint was dry, we attached the art and labels with spray glue, and sealed the ornaments with spray varnish. You could use Mod Podge in place of both.

We hope you enjoy, and if you come up with other creative ways to use the PDFs, please do pass them along!

Thursday, August 11, 2011

More Last Minute Knitted gifts


It isn't often that one likes a sequel more than the original book. That is certainly the case with Joelle Hoverson's More Last Minute Knitted Gifts (see projects here- Ravelry login required). I checked out a copy from the library recently, and am smitten with it. There are so many beautifully simple, yet stunning projects. I currently have the Kid's Vest in progress for my son (it's perfect subway knitting), and have Leah's Lovely cardigan queued for myself. Alson on the horizon Baby Bonnet and Baby Cardigan on the horizon for a couple co-workers who are expecting. If one was an afghan knitter, Joelle has three amazing designs: Nesting Squares, Entrelac Baby Blanket, and Bright Stripes- cheerful for a new baby, but perfect for anyone in need of a little comfort. I'm also planning on knitting several Soft Baskets to in which to place small Christmas gifts. If you are looking for inspiration for knitting for your gift stash, look no further!

Thursday, October 28, 2010

November Home Altars


We're just about to celebrate the Feast of All Saints, so this piece showing the Holy Trinity surrounded by Saints filling heaven would be a great addition to your home altar. (Extra points to those of you who can identify any of the Saints pictured.)

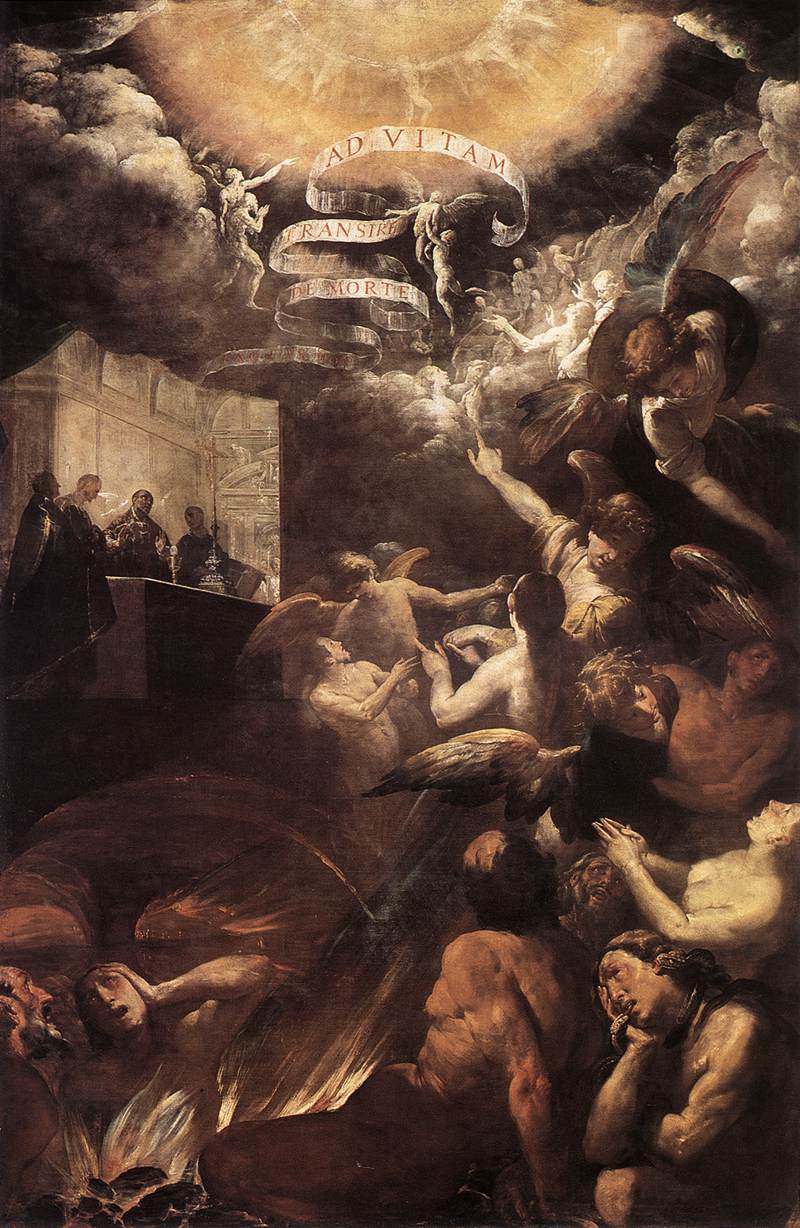
If you'd like something that includes purgatory, you might want to try one of these. This one by Giovanni Crespi depicts a soul being released from purgatory because of prayers offered by those on earth. What a beautiful reminder to all of us!
You also might want to consider simply placing family photos on your prayer table as a reminder to pray for the souls of those who have died and to also pray for those still living as you work to finish the race.

Monday, September 20, 2010

Art for Home Altars

I've been working on a little project to keep home altars (a.k.a prayer tables, sacred spaces, etc.) up to date in simple ways. I'm an absolute devotee of having a space like this in my home. It's a peaceful haven, a public witness, and a constant reminder to my family of the True Center of our lives. You can read more about the details here and here.

One of the easiest ways to keep your prayer center up to date is with free (or almost free) art from religious calendars and the internet. We've posted lots of art and art links on this blog over the years and will continue to do so (we're big fans), so keep checking in for more.

For ease of use nothing beats a clear acrylic free-standing frames available from those gigantic discount stores. They're very inexpensive and the art can be easily changed by just sliding it out - no assembly required! My favorite size is 8 X 10, but they also come in smaller sizes that would be suitable for holy card art, inspirational quotes, Christmas card art, etc.

To begin with, I'm planning to print this piece by Domenico Feti of a boy and his guardian angel. The Feast of the Guardian Angels is coming up on October 2 and I like this strong, kind angel pointing the way to heaven. The demon fleeing the scene is a nice reminder of Who's in charge!

To capture this image, I will right click on the picture and chose the "Copy Image" option.

From there, open a word processing program like MS Word or MS Publisher and paste it onto a blank page by either hitting Ctrl and V or Paste Special on the Edit menu. I haven't tried it, but assume Open Office programs would work the same way.

This particular piece pasted in as an 8 x 10, so I just need to print and slide it in my frame. I recommend heavier paper if possible so it doesn't wrinkle if you use it more than once. When you're done with it, if you're like Lucy just neatly file it away. If you're like me, put it in a box with the other 100 pieces and shuffle through them every year to find it.